- Published on
How to customize a Google Form
- Authors

- Name
- Rami Rashid
- @KingRomstar
Google Forms are Awesome! They make capturing data super simple, they're quick to build, and easy to share. A common problem with Google Forms is that their design's are immutable which leads to some funky web page designs. In this post we're going to cover how to create a custom form that integrates with Google Forms so that you can capture our data while still maintaining the same look and feel of our website!
The Plan
- First we're going to breakdown what makes up a Google Form.
- We will then embed our Google Form as an iFrame to extract it's input properties.
- We're then going to extract the parts we need to integrate the form within our website.
- Build out our simple custom form to save our data to Google Forms.
- And finally we will write the necessary JavaScript to save our form data to Google Docs.
- The before and after
What makes up a Google Form
An embedded Google Form is a fully fledged web page which means it has all of the HTML, CSS, and JavaScript necessary to function on it's own. The part of the embedded Google Form that we care about is located within the <form> Element.
- The <form> element is compromised of an action URI which is the Google Doc that contains all of our saved responses.
- A collection of <input> elements that map to the actual data that will be saved to the Google Form (This is the most important part)
- And a collection of validation logic for each of the input fields located within the <form> i.e. Email format validation logic.
Embedding the Google Form within our Website
Upon embedding a Google Form within our website you'll quickly realize that the Google Form is an iFrame and this adds a few benefits and some critical drawbacks.
Pros:
- Security, because Google Forms are served up from Google's domain our website cannot manipulate the JavaScript nor the CSS within the iFrame, this is also a drawback as we'll come to later. This prevents hackers from embedding a banking website within their own website and manipulating the JavaScript to steal user's credentials.
- All of the associated JavaScript and CSS is packaged into a single web page which is easily integrated with a single line of code e.g.
<iframe src="https://docs.google.com/forms/d/e/2DkkskDKdkJ/viewform?embedded=true" width="640" height="1380" frameborder="0" marginheight="0" marginwidth="0">Loading…</iframe>
- They can be shared an infinite number of times to an infinite number of sources.
Cons:
- iFrames from a different web domain are mostly immutable barring a few properties e.g. width="640" height="1380" and this makes working with them extremely difficult as their design is locked in stone as is their functionality so customization is out of the question.
- An embedded iFrame may have unexpected consequences on our website such as moving other elements around, performance problems especially on mobile devices, and even security risks if the embedded website is compromised for any reason, remember an iFrame simply requests the web page and includes everything from the source into our website although sandboxed it is essentially another browser tab and can download files, show alerts, etc.
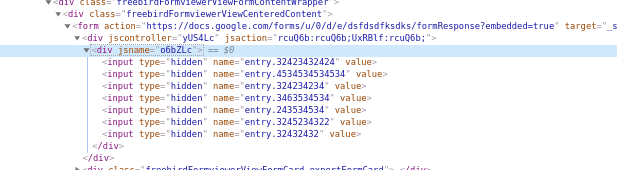
Extract the form properties!
Now that we have our Google Form embedded in our website as an iFrame we can extract the property values necessary to save our custom form data to our Google Form.

- Look for the first div embedded within the <form> element, it will have a single attribute that looks something like this: jsname="r1bIDm". These are the actual property names that will need to be utilized when we save our data to Google Forms, without these properties the data will not map to our fields within our Google Form and the save request will return an HTTP 400 response and will therefore be unsuccessful.
Let's build our custom form
Now it's time to build our custom form which matches our website's style. Here is an example form that we will use to save our data to our Google Form Doc.
<form onsubmit="return submitFunction(event);">
 <label htmlFor="fname">First name:</label><br />
 <input type="text" id="fname" name="fname" /><br />
 <label htmlFor="lname">Last name:</label><br />
 <input type="text" id="lname" name="lname" />
 <button>Submit!</button>
</form>
The JavaScript to save our form data
Now that our custom form HTML is written within our application we can write the necessary JavaScript to extract the values and save our data upon a submit button click.
<script>
// since it's a form submission we must format the request body properly
// and this function does just the trick!
const urlFormEncoded = (obj) => {
  var str = [];
  for (var p in obj)
    str.push(encodeURIComponent(p) + "=" + encodeURIComponent(obj[p]));
  return str.join("&");
}

const submitFunction = async (event) => {
event.preventDefault(); // this prevents the Form from submitting to server

const firstName = document.getElementById('fname').value;
const lastName = document.getElementById('lname').value;

const requestFormBody = {
    'entry.381772108': firstName,
    'entry.244442038': lastName,
  }

  await submitForm(requestFormBody)

}

const submitForm = async (requestFormBody) => {
  try {
    await fetch('https://docs.google.com/forms/u/0/d/e/234234sdfds/formResponse', {
      headers: {
        'Content-Type': 'application/x-www-form-urlencoded ',
      },
      method: 'POST',
      mode: 'no-cors',
      body: urlFormEncoded(requestFormBody)
    });
  } catch (err) {
    console.error('err:', err);
  }
}
</script>
Google Form Plain Example:
The Finished Product:
